
January 20, 2021
Shrimp Parm and
Even More, Confessions of a Pinterest Artist!
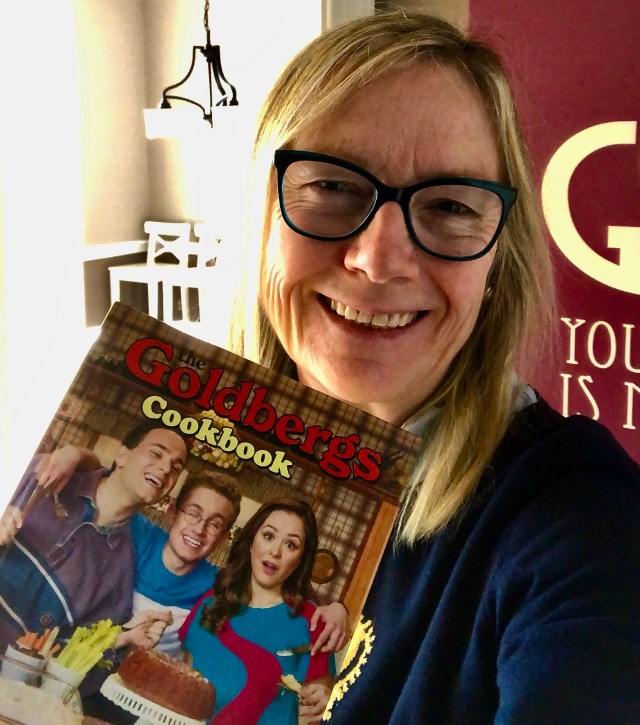
This month’s Shrimp Parm recipe is featured in Beverly Goldberg’s
The Goldbergs Cookbook.
As a youngster, I used to know each day of the week by which TV programs were on that evening. Of course, that was when there were just four television channels available, and when such classic shows as Batman, Bewitched, and Gilligan’s Island ruled prime time.
(I know, I am revealing my age here! I also walked 5 miles to school each day in the snow…)

As a youngster, I used to know each day of the week by which TV programs were on.
Today’s television viewer has many more TV viewing options to choose from,
but I still find myself looking forward to certain programs throughout the week.
One such program is The Goldbergs. Currently in its eighth season, The Goldbergs
is set in the 1980’s and was created by Adam F. Goldberg, based on his childhood.

The Goldbergs is currently in its eighth season.
The Goldbergs Cookbook was written by Beverly Goldberg.
The character of Goldberg’s mother, Beverly, plays prominently in the show, and is often portrayed cooking up family favorites.

A script from The Goldbergs, displayed at The ABC Commissary in Hollywood Studios, at Walt Disney World.
November 2015
AND the favorite dish, of all of the Goldberg favorites, being Shrimp Parm. One of the first recipes featured in
Beverly Goldbergs’ fun cookbook (2020) is for this dish, frequently mentioned in the series.

Beverly Goldbergs’ cookbook is fun!
Bevy’s Shrimp Parm is a tasty recipe, and one that I will be making again, along with several more recipes in Beverly’s collection! This recipe has also been featured in articles here, and here.
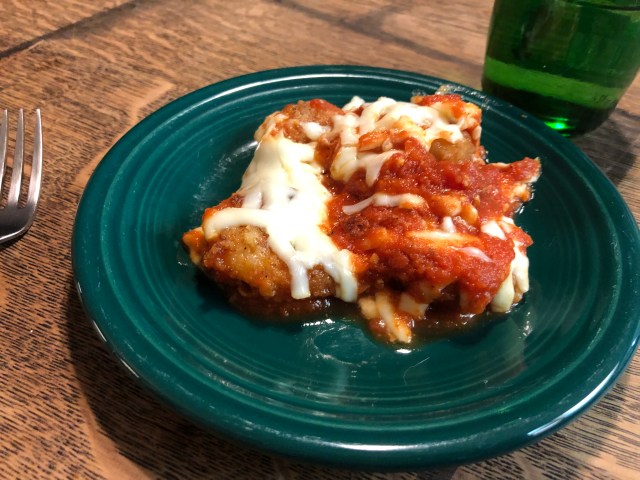
Bevy’s Shrimp Parm is a tasty recipe, and one that I will be making again.
Bevy’s Shrimp Parm
As with most every recipe that I ever make, I tweaked this one a little to fit my tastes, using what I had on hand. :O) My recipe is below. For Beverly’s original recipe, see here, and here.
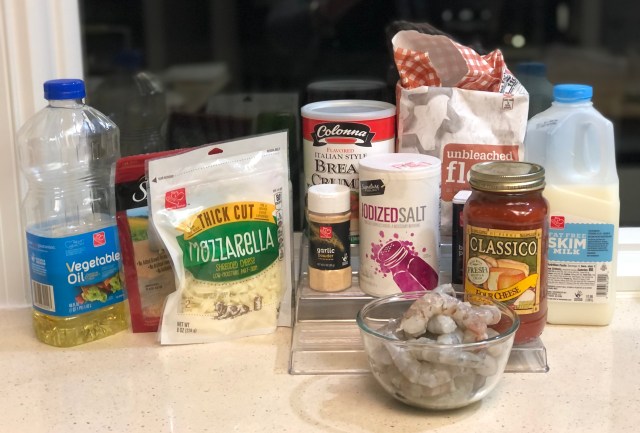
Ingredients used to make this recipe.
Shrimp Parm

Ingredients
1-pound of Gulf shrimp, peeled and cleaned
1-cup skim milk
1-cup Italian style seasoned breadcrumbs
1-cup flour
1-2 teaspoon garlic powder
1/4 teaspoon salt
1/4 teaspoon pepper
Vegetable Oil (For frying)
1 (24 ounce) jar Spaghetti Sauce (I used Classico.)
2 cup grated mozzarella cheese
1/2-1 cup fresh grated Parmesan cheese
Directions
Preheat oven to 350 degrees.
Apply nonstick cooking spray to a 9 x 13 inch pan.
Place shrimp in milk in bowl.
Set aside.
Heat up 1-2 inches vegetable oil in skillet to medium high.
(I used my electric skillet.)
Meanwhile, combine bread crumbs, flour, garlic powder, salt and pepper in large ziplock bag.
Shake off excess milk from shrimp, then, place in ziplock bag and shake.
Carefully place breaded shrimp in heated oil, cooking until golden.
Remove from heat and drain on paper towel.
Pour half of jarred sauce in prepared pan.
Place fried shrimp on top.
Sprinkle half of mozzarella on top of shrimp.
Pour remainder of jarred sauce on top of shrimp.
Sprinkle remainder of mozzarella cheese on top.
Bake for 15 minutes, or until sauce is bubbling.
Plate, and serve with Parmesan cheese on top.
Enjoy!
Inspired by Pinterest
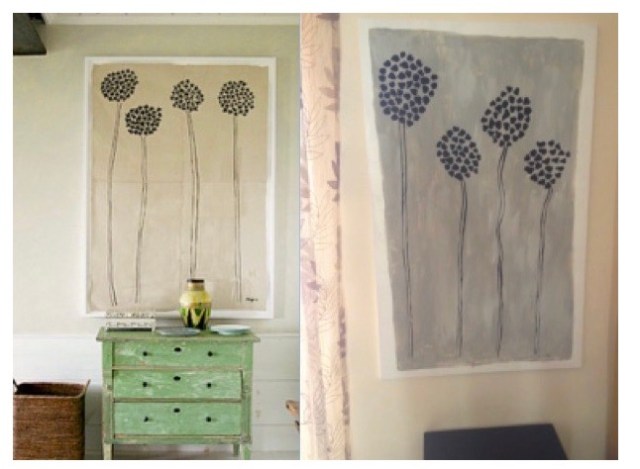
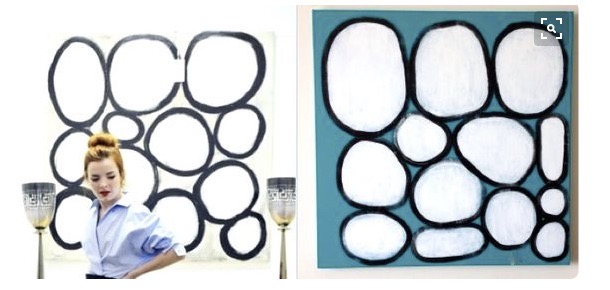
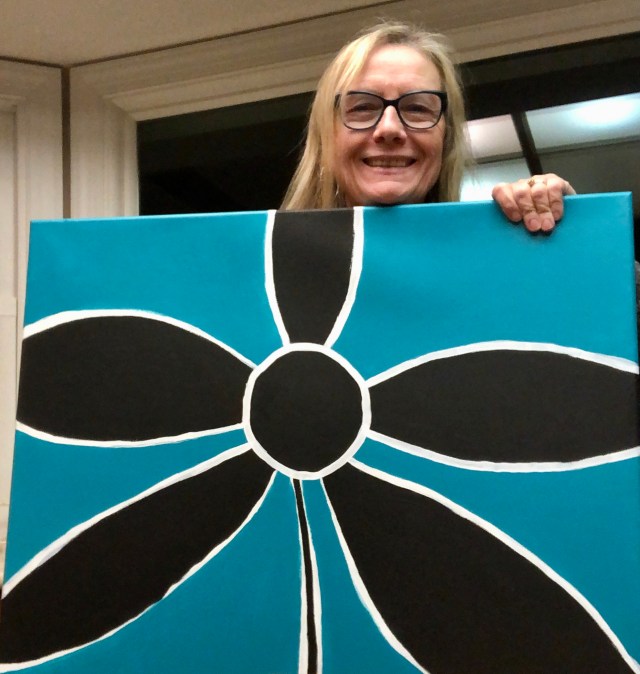
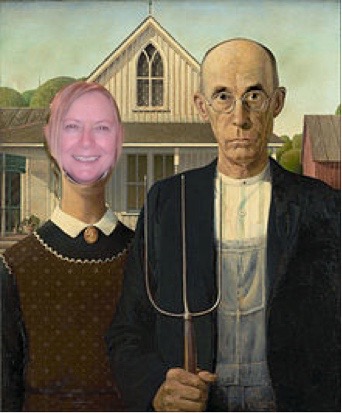
In the past, Pinterest has been a source of painting ideas for me. Recently, Pinterest inspired my painting again! Pinterest, with its source of creative ideas, has inspired me once again. Stumbling upon the photo (below) of this contemporary flower print on Pinterest, I knew that I had to recreate it (but with more of a colorful flare).

Pinterest Photo, artist unknown Daisy, by Annette 2021
Stumbling upon the photo of this contemporary flower print on Pinterest,
I knew that I had to recreate it.
Other Pinterest Painting Projects
In 2014, I went on a mini-painting spree, thanks to Pinterest’s motivation. The results are shown below.
Pinterest Photo, artist Hugo Guinness Dandelions, by Annette, July 2014
For instructions on how to paint Dandelions, click here.
Pinterest photo, artist unknown Happy, by Annette, August 2014
Read about Happy and how to paint your own, here.

Pinterest photo of Blue Flower by Lisa DeJohn Blue Blossom, by Annette
September 2014
For DIY instructions for Blue Blossom, click here.
Painting Daisy
Here are the steps that I used to paint Daisy.
Use them to paint your own interpretation of this piece. :o)
Painting Materials
Paint Canvas
30 inches x 30 inches canvas
Drop Cloths
I use trash bags, that I have cut open.
Chalk
I used a piece of sidewalk chalk that I keep for my granddaughters to use. :o)
Acrylic Paint
I used about 1/3 of an 8-ounce bottle of white multi-surface premium satin acrylic paint by Craftsmart.
One entire 2-ounce bottle of aqua satin acrylic paint by FolkArt
Colors vary, I recommend FolkArt’s aqua for this vivid background.
One 2-ounce bottle black acrylic paint by DecoArt
Paint Brushes
To be honest, I forgot to keep track of which brushes I used.
I believe that I used the three brushes shown in the photo below, a #1,#2,#4 + a small #2/0 brush (not pictured) for signing.

Some materials used to create Daisy.
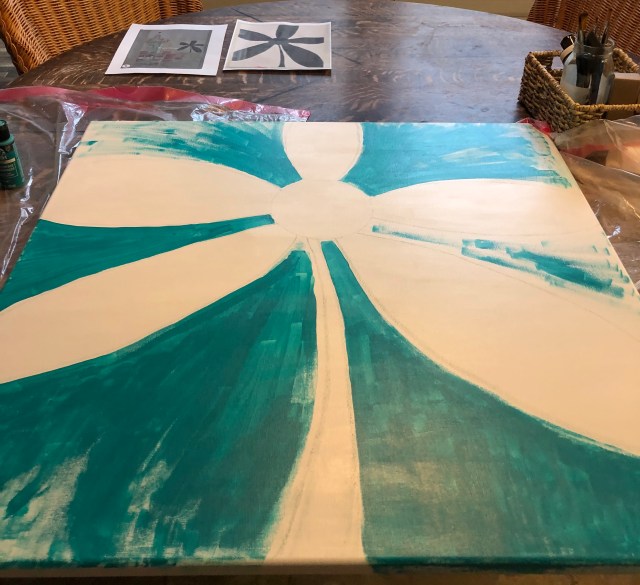
My “How To” Instructions
Place down a drop cloth.
Give the canvas a white base coat, including the sides,
using a wide paintbrush, like a #1.
Give the canvas two base coats, letting it
dry in-between each coat.
You can set the canvas up on four glasses to dry, to prevent the painted canvas from sticking to the drop cloth.
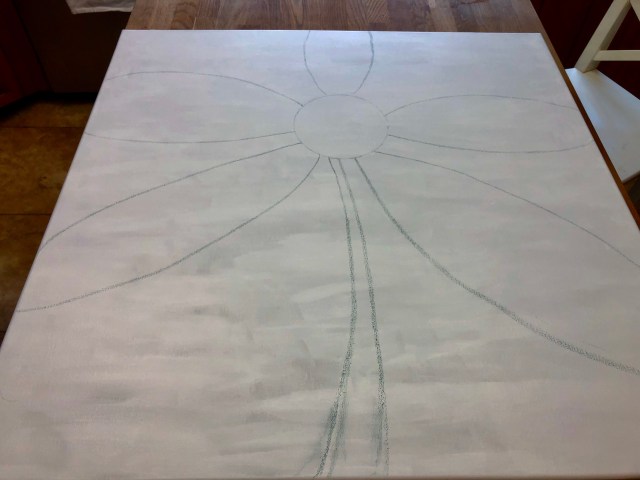
With chalk, sketch out the design, using the blog photos as your guide.
(Upon painting’s completion, and when dry, use a clean
paint brush to whisk away any excess chalk.)
Paint the background, around the daisy, with the aqua paint, making sure to paint the canvas’s front and sides.
This may take a couple of coats of paint to cover the canvas to desired look.
Let it dry in-between each coat.
Allow to completely dry before continuing.
Next, paint the daisy black.
Again, this may takes 2-3 coats.
Using white paint, outline the daisy, as the blog photos indicate.
Touch up your painting, defining lines, and making it look more finished.
Remember to sign your name on your painting with a small paintbrush. :o)
Give the canvas a white base coat.
With chalk, sketch out the design, using the blog photos as your guide.
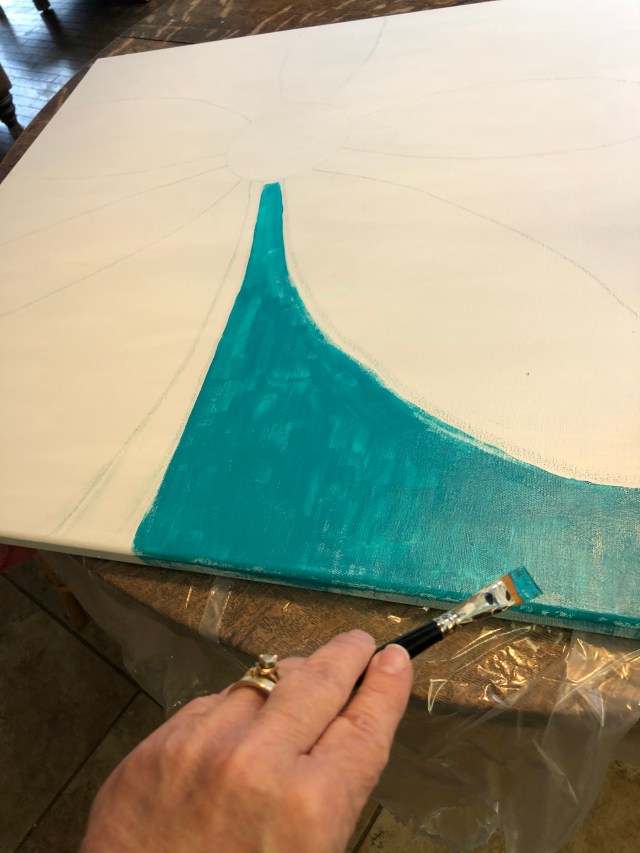
Paint the background with aqua paint.

Paint the canvas’s front and sides, too.
It may take a couple of coats of aqua paint.

Allow to completely dry before continuing.
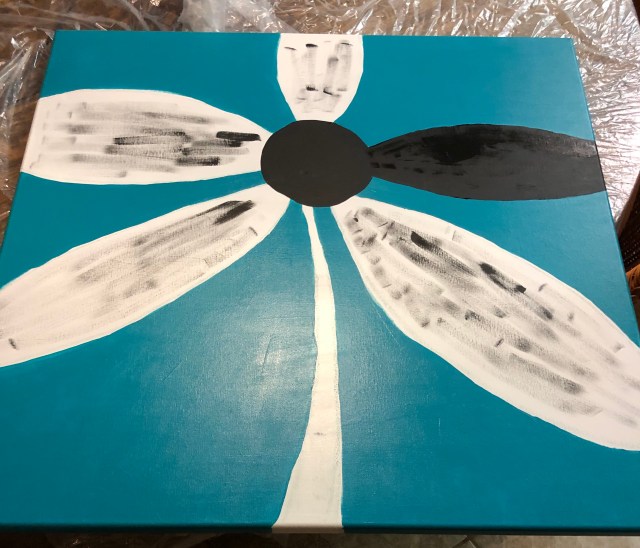
Paint the daisy black.

Touch up your painting, defining lines, and making it look more finished.
Daisy

Cooking with Gammy
Snowmen were the theme for our most recent “Gammy Day”.
Making paper snowmen/snowwomen was fun.
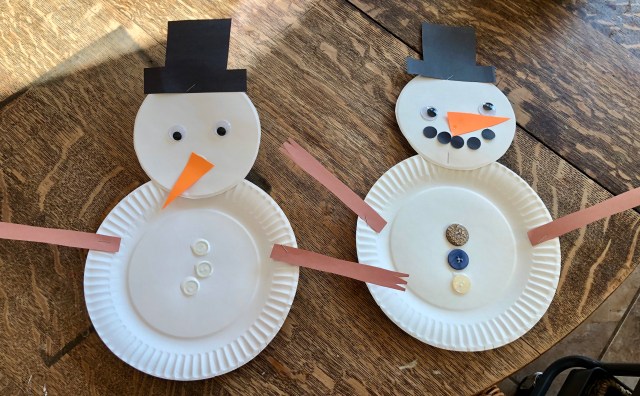
The grands(grand children) also enjoyed making, and eating, the edible variety of snowmen in the form of Nutter Butter Snowmen/Snow Women and Graham Cracker Snowmen/Snow Women. :o)
Nutter Butter Snowmen/Snow women

Ingredients
Nutter Butter Sandwich Cookies
White almond bark, or White chocolate chips
Mini chocolate chips
m & ms
Wax paper
Directions
On baking sheet place wax paper.
Melt almond bark slowly in microwave.
Dip to top of a Nutter Butter in the almond bark.
Decorate, using mini chocolate chips for eyes,
orange m&m’s for a nose,
and m&m’s for buttons.
Place in refrigerator to set.
Store in airtight container in fridge, or freezer.
Enjoy!
Graham Cracker Snowmen/Snow women
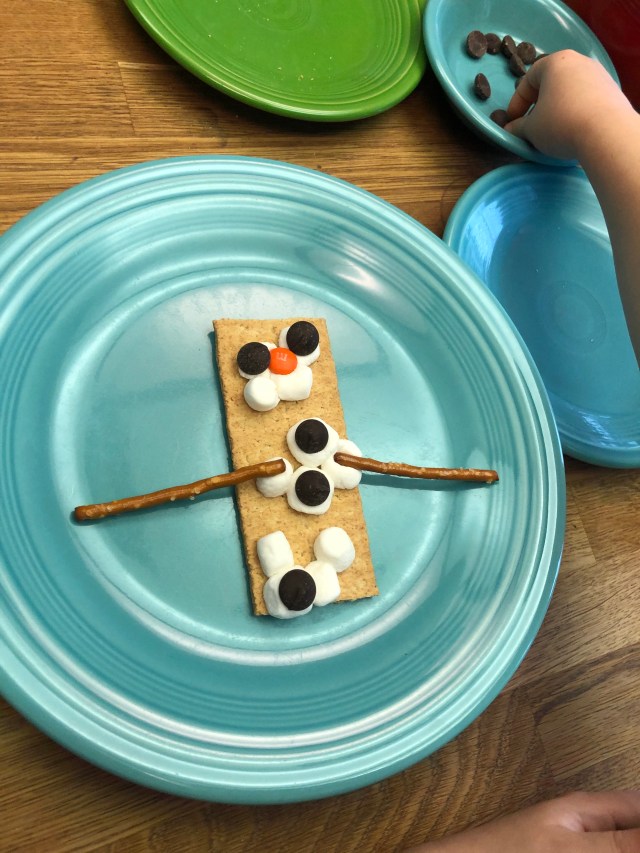
Ingredients
Large marshmallows
(I had to use the mini variety in a pinch.)
Chocolate chips
Graham crackers
Pretzel sticks
Orange m&m’s
Directions
Place graham cracker on microwave-safe plate.
Place three large marshmallows on cracker and microwave until puffy.
About 12-18 seconds.
Decorate with chocolate chips for eyes and buttons,
an orange m &m for a nose,
and two pretzel sticks for arms.
Eat immediately, making sure that the marshmallow is not too hot.
Enjoy!
Check Out These Earlier Art-related Posts
True Confessions of a Pinterest Artist, July 2014, here.
More True Confessions of a Pinterest Artist, August 2014, here.
Still More Confessions of a Pinterest Artist, September 2014, here.
May your days be blessed, and your taste buds happy!
Thank you for reading!
I’m Annette Stuff
Look for the Next Blog!
Look for the next post on, February 14, 2021, if not before. :o)
Follow My Instagram
Check out my Instagram page at imannettedotnet.
Get I’m Annette Delivered Straight to Your Inbox!
Be an I’m Annette follower! It’s easy!!! It’s fun!!! It’s absolutely free!!!!
Receive my blog via email, FREE, (yes, I said FREE), immediately upon each posting.
Sign up now, on the right-hand side of this page, or click here.
A Special Note about Photos to I’m Annette Followers!
If you are receiving this blog via email, and if some of the photos do not come through clearly, please click on imannette.net, or click here to refresh the post.
Please, Leave a Kind Comment!
Thank you blog readers! I LOVE hearing your kind comments!
Please post yours positive thoughts in my comment section at the bottom of the blog post.
Check Out (Almost) Eight Years of Past Blog Posts!
To enjoy any, or all, of my past blog posts and photos, click here, or go to imannette.net, selecting the posts that you desire to see in the Recent Posts,
or you can “search” a topic in the Archives section, in the upper right-hand side.
I have been blogging since 2013, so there are plenty of posts to choose from!
Finally, brothers and sisters,
whatever is true, whatever is noble,
whatever is right, whatever is pure,
whatever is lovely, whatever is admirable
–if anything is excellent or praiseworthy
–think about such things.
Philippians 4:8


Love your pictures!
LikeLike
Thank you, Patti!
LikeLike
What a fun blog, enjoyed the recipes sharing memories of yesterday, and learning some new techniques for painting. Nice job. Barb,
LikeLike
Thank you, Barb. Let me know how the Shrimp Parm and painting turn out for you!
LikeLike